When I first started getting deeply into advanced digital image editing, I had a very destructive, chaotic workflow.
If I was working on a complex portrait and needed to completely replace a piece of clothing—like swapping out a modern shirt for a vintage soccer jersey—I would do all of my cloning, painting, and shadowing directly on the base background layer.
I thought I was being efficient. But if I made a mistake, or if the shadow under the collar looked incredibly fake and jarring, I couldn’t easily undo it. I had permanently painted over the original pixels. The entire image was scarred.
Eventually, I discovered the concept of “non-destructive editing” using transparent layers and layer masks.
I learned to isolate every single adjustment. I put the shadows on one layer, the highlights on a second layer, and the color correction on a third. If the lighting looked wrong, I didn’t have to throw the whole image in the trash; I just clicked on the specific lighting layer and adjusted the opacity.
I gained absolute, surgical control over the final masterpiece because I finally learned how to isolate my variables.
For the first few years of my specialty coffee journey, my morning routine was the culinary equivalent of a flattened, permanently scarred JPEG file. I was brewing blindly, making dozens of mistakes, and I had absolutely no idea how to troubleshoot them.
Here is the honest, highly technical story of what I wish I knew about coffee brewing earlier, how I finally learned to isolate my culinary variables, and the fundamental rules that would have saved me years of bitter, sour frustration.
The Trap of the Flattened Brew
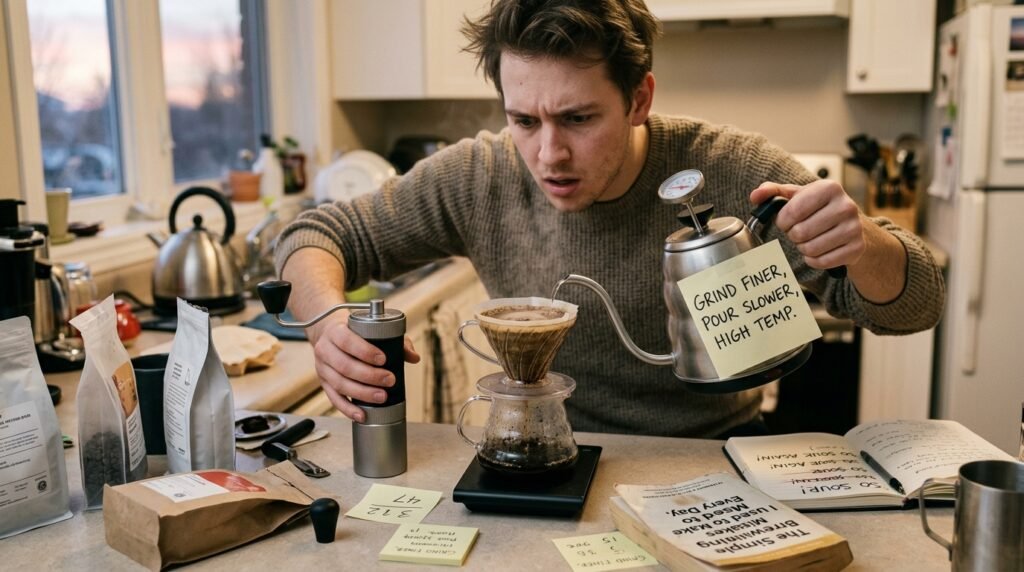
The absolute biggest mistake I made in my early coffee days was trying to fix a bad cup of coffee by changing three things at the exact same time.
If I woke up, brewed a V60 pour-over, and it tasted aggressively sour and weak, I would panic. The next morning, I would try to fix it by grinding the coffee finer, pouring the water slower, and increasing the temperature of my kettle all in one single session.
Sometimes, the coffee would taste better. Sometimes, it would taste significantly worse.
But because I changed three variables at once, I had absolutely no idea which change actually solved or worsened the problem. I learned nothing from the experiment. I was just throwing darts at a wall while blindfolded.
This chaotic, multi-tasking approach to troubleshooting is the exact root of (The Simple Brewing Mistakes I Used to Make Every Day), because I was never giving myself the opportunity to understand the physics of my own kitchen.
I wish I knew earlier that you must isolate your variables. If your coffee tastes bad, you are only allowed to change one single thing the next morning.
If you think the grind size is the issue, keep your water temperature and your pouring speed exactly the same, and only adjust the grinder. This is the only way to build a mental map of what each specific adjustment actually does to the flavor profile.
I Wish I Knew That Coffee Can Be Too Fresh
When I finally stopped buying cheap supermarket coffee and started buying premium, locally roasted specialty beans, I developed a massive misconception about freshness.
I noticed that the best roasters always stamped a “Roasted On” date on the back of the bag. I assumed that coffee was like bread: the closer you consume it to the date it came out of the oven, the better it will taste.
I would literally wait outside my local roastery, buy a bag of beans that had been roasted that exact same morning, rush home, grind them up, and brew a cup.
And it always tasted terrible.
The coffee was incredibly bubbly in the filter, and the resulting liquid tasted harsh, metallic, sharp, and weirdly hollow. It lacked any of the sweet caramel or delicate fruit notes that were printed on the label.
I wish someone had told me about the “Degassing Phase.”
During the extreme heat of the roasting process, coffee beans trap a massive amount of carbon dioxide gas inside their cellular walls. If you try to brew the coffee immediately after it is roasted, that trapped gas violently escapes when the hot water hits it.
This massive release of gas physically pushes the water away from the coffee grounds. The water cannot penetrate the bean, meaning it cannot extract the sweet sugars. You end up with a sour, under-extracted, gassy cup of liquid.
I eventually learned that coffee needs to rest. Implementing this mandatory waiting period is exactly (What I Do Differently Now When Making Coffee).
Now, when I buy a bag of freshly roasted coffee, I put it in my dark pantry and I completely ignore it for at least seven to ten days. Allowing the beans to naturally degas and settle down transforms the flavor entirely. When you finally brew it on day ten, the gas is gone, the water can penetrate easily, and the coffee is unbelievably sweet and vibrant.
I Wish I Knew the 98 Percent Rule Earlier
This is perhaps the most embarrassing realization of my entire journey, because it is so incredibly obvious in hindsight.
I was spending twenty-five dollars on a tiny bag of world-class, high-altitude coffee from Kenya. I was carefully weighing the beans and grinding them with a precision burr grinder.
And then, I was dumping heavy, heavily chlorinated municipal tap water directly over them.
A cup of black coffee is approximately 98.5 percent pure water. The coffee bean is just the flavoring agent. It is a mathematical impossibility to brew a great cup of coffee if your base solvent tastes like a swimming pool.
My tap water was completely hijacking the chemical extraction. The heavy calcium and magnesium were binding to the delicate fruit acids of the Kenyan beans, turning them dull and flat. The chlorine was leaving a harsh, metallic bite on the back of my tongue.
I wish I had known that the water is the canvas. If the canvas is dirty, the paint doesn’t matter.
The day I finally bought a cheap charcoal water filter pitcher for my refrigerator and started using neutralized, clean water for my kettle was the day my coffee truly became café-quality. The heavy noise was erased, and the pristine, high-definition flavor of the bean finally snapped into focus.

I Wish I Knew to Stop Using a Soup Spoon
Before I got serious about my morning routine, I treated coffee like a casual baking recipe. I thought volume was an acceptable way to measure things.
I kept a metal soup spoon in my bag of coffee. Every morning, I would scoop “three heaping spoonfuls” into the grinder.
I didn’t realize that I was actively sabotaging my extraction, because I didn’t understand that coffee beans have wildly different physical densities.
If I bought a dark roast, the beans were puffy and light. If I bought a light roast, the beans were tiny and heavy. Three scoops of dark roast might weigh 18 grams, while three scoops of light roast might weigh 30 grams.
By trusting my eyes instead of gravity, my coffee-to-water ratio was fluctuating violently every single day. My coffee was a chaotic, unpredictable gamble.
I wish I knew that a digital scale is not a tool for snobs; it is the ultimate tool for consistency.
Buying a twenty-dollar scale and weighing my coffee in grams was undeniably (The Simple Trick That Made My Coffee Taste Better). It allowed me to lock my recipe to a perfect 1:16 ratio. By removing the guesswork, I guaranteed that if I brewed a masterpiece on Tuesday, I could effortlessly replicate it on Wednesday.
I Wish I Knew That Heat Destroys Aromatics
There is a deeply ingrained cultural myth that coffee must be brewed with violently boiling water.
I used to put my heavy whistling tea kettle on the stove and let it scream. I wanted the water as dangerously hot as physically possible. I would rip it off the burner and aggressively dump the liquid fire straight onto my ground coffee.
I thought I was maximizing the strength of the beverage. In reality, I was torching the beans.
Coffee beans contain delicate, highly volatile aromatic oils. These oils are fragile. When you hit them with 212°F (100°C) rolling boiling water, the kinetic energy instantly vaporizes those delicate floral and fruit notes, sending them straight up into the air of your kitchen instead of into your mug.
Simultaneously, that extreme, aggressive heat penetrates deep into the cellular walls of the bean and rapidly rips out the harsh, bitter plant tannins.
My coffee always tasted like burnt wood because I was literally burning it.
I wish I had known the “Off-Boil” rule earlier. I still bring my kettle to a boil, but now, I pull it off the hot stove and let it sit uncovered for exactly forty-five seconds.
That short pause allows the aggressive, chaotic bubbling to stop. The water drops to a gentle 200°F (93°C). This temperature is the golden key. It is hot enough to melt the heavy, caramelized sugars, but cool enough to protect the delicate aromatic oils and leave the bitter tannins locked in the filter.
I Wish I Knew the Importance of the Pre-Heat
Another invisible mistake I made for years happened right at the finish line of the brewing process.
I would spend five minutes executing a flawless V60 pour-over. I would hit my ratios, respect my water temperature, and wait for the perfect extraction.
Then, I would pour that beautiful, steaming liquid directly into a freezing cold, heavy ceramic mug that had been sitting in my winter kitchen cabinet all night.
The moment the hot coffee hit the freezing ceramic, it suffered a violent thermal shock. The thick ceramic walls rapidly absorbed the heat from the liquid, crashing the temperature of the coffee instantly.
This violent temperature crash physically stalls the volatile aromatic compounds. The coffee instantly loses its vibrant, sparkling acidity and tastes completely flat and dull.
I wish I knew that maintaining thermal stability is crucial.
Now, the very first thing I do when I walk into the kitchen is fill my ceramic mug with scalding hot tap water. I let the mug sit and absorb the heat while I grind my beans and brew the coffee. Right before I pour the finished beverage, I dump the tap water out.
Pouring hot coffee into a pre-warmed mug allows the liquid to cool down slowly, gracefully, and naturally, preserving every single delicate flavor note along the way.
Building the Perfect Workflow
When you are learning a new, complex skill—whether it is non-destructive photo editing with dozens of transparent layers, or manual coffee brewing with a dozen invisible variables—the learning curve can feel incredibly steep and frustrating.
It is easy to get overwhelmed. It is easy to assume that you just aren’t good at it, or that you need to buy a much more expensive piece of equipment to fix your problems.
But the magic isn’t in the equipment. The magic is in the workflow.
I spent years drinking bad coffee because I was working on a flattened layer. I was rushing the beans, burning them with boiling water, guessing the measurements with a spoon, and trying to fix everything all at once.
If your coffee is currently frustrating you, I encourage you to slow down and isolate your layers.
Filter your water. Buy a scale and weigh your beans. Let your freshly roasted coffee rest for a week before you open the bag. Let your kettle cool down for forty-five seconds before you pour. Pre-warm your ceramic mug.
And most importantly, if you make a mistake, only change one single variable the next morning.
When you finally stop guessing and start treating coffee brewing as a deliberate, controlled, layer-by-layer process, the chaos will completely vanish. You will gain absolute mastery over your kitchen, and you will finally be able to pour a flawlessly extracted, wildly sweet masterpiece every single morning.

My name is Daniel Carter, I am 35 years old, and I live in the United States. I have been passionate about aquariums for many years, and what started as a simple hobby quickly became a lifelong interest in aquatic life, fish behavior, and responsible tank care.
Through TheBrightLance, I share real experiences, practical knowledge, and honest lessons learned from maintaining different types of aquariums. I enjoy testing equipment, studying fish behavior, improving maintenance routines, and helping beginners avoid common mistakes.
My goal is to make aquarism easier, more ethical, and more enjoyable for everyone — whether you are setting up your very first tank or looking to refine your techniques.